Building a Robust Media Server: Proxmox LXC + Docker + VPN
/ June 24, 2025
This guide details the process of setting up a comprehensive, private, and efficient media server environment. We'll leverage Proxmox for lightweight virtualisation, an unprivileged LXC container for secure isolation, Docker for flexible application management, and Gluetun for robust VPN integration.
Table of Contents
- Introduction
- Proxmox LXC Container Setup: A Step-by-Step Guide
- Docker & Docker-Compose Installation
- Docker Compose Configuration (docker-compose.yml)
- VAAPI Transcoding Preparation and Tuning
- Permission Management
- Maintenance & Troubleshooting
- Backup Strategy
- Initial Configuration of Services (Post-Deployment)
0. Introduction
In this guide, we will build a robust media server using Proxmox, an unprivileged LXC container, Docker, and Gluetun for VPN. This setup ensures that your media services are secure, isolated, and capable of handling high loads with efficient resource usage.
For this setup I am using a Proxmox host with an Intel N100 and an external USB HDD for media storage. The host is running Debian 12, and the LXC container is configured with Docker to run media services like Jellyfin, Sonarr, Radarr, and qBittorrent. The Gluetun VPN container ensures all traffic is securely routed through a VPN provider (e.g., NordVPN), enhancing privacy and security. The guide is tailored for users with basic Linux and Docker knowledge, aiming to create a secure, high-performance media server.
This guide, as with the rest of the site is a work in progress, and I will be adding more details and images as I continue to refine the setup. If you have any questions or suggestions, feel free to reach out.
1. Proxmox LXC Container Setup: A Step-by-Step Guide
The heart of our media server lies within an unprivileged Linux Container (LXC) on Proxmox. This choice offers a balance of performance and isolation, making it better than a full virtual machine for this use case.
1.1. Creating the LXC via Proxmox Web UI
Follow these steps using the Proxmox web interface (https://your-server-ip:8006/).
-
Initiate Container Creation: Right-click on your server node (e.g.,
nucbox) in the Proxmox UI and select "Create CT".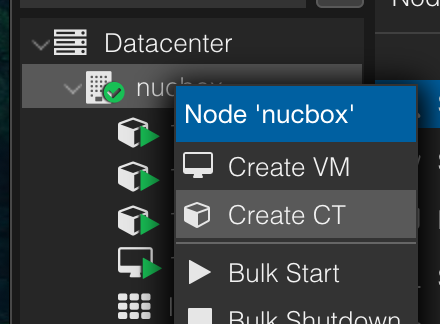
-
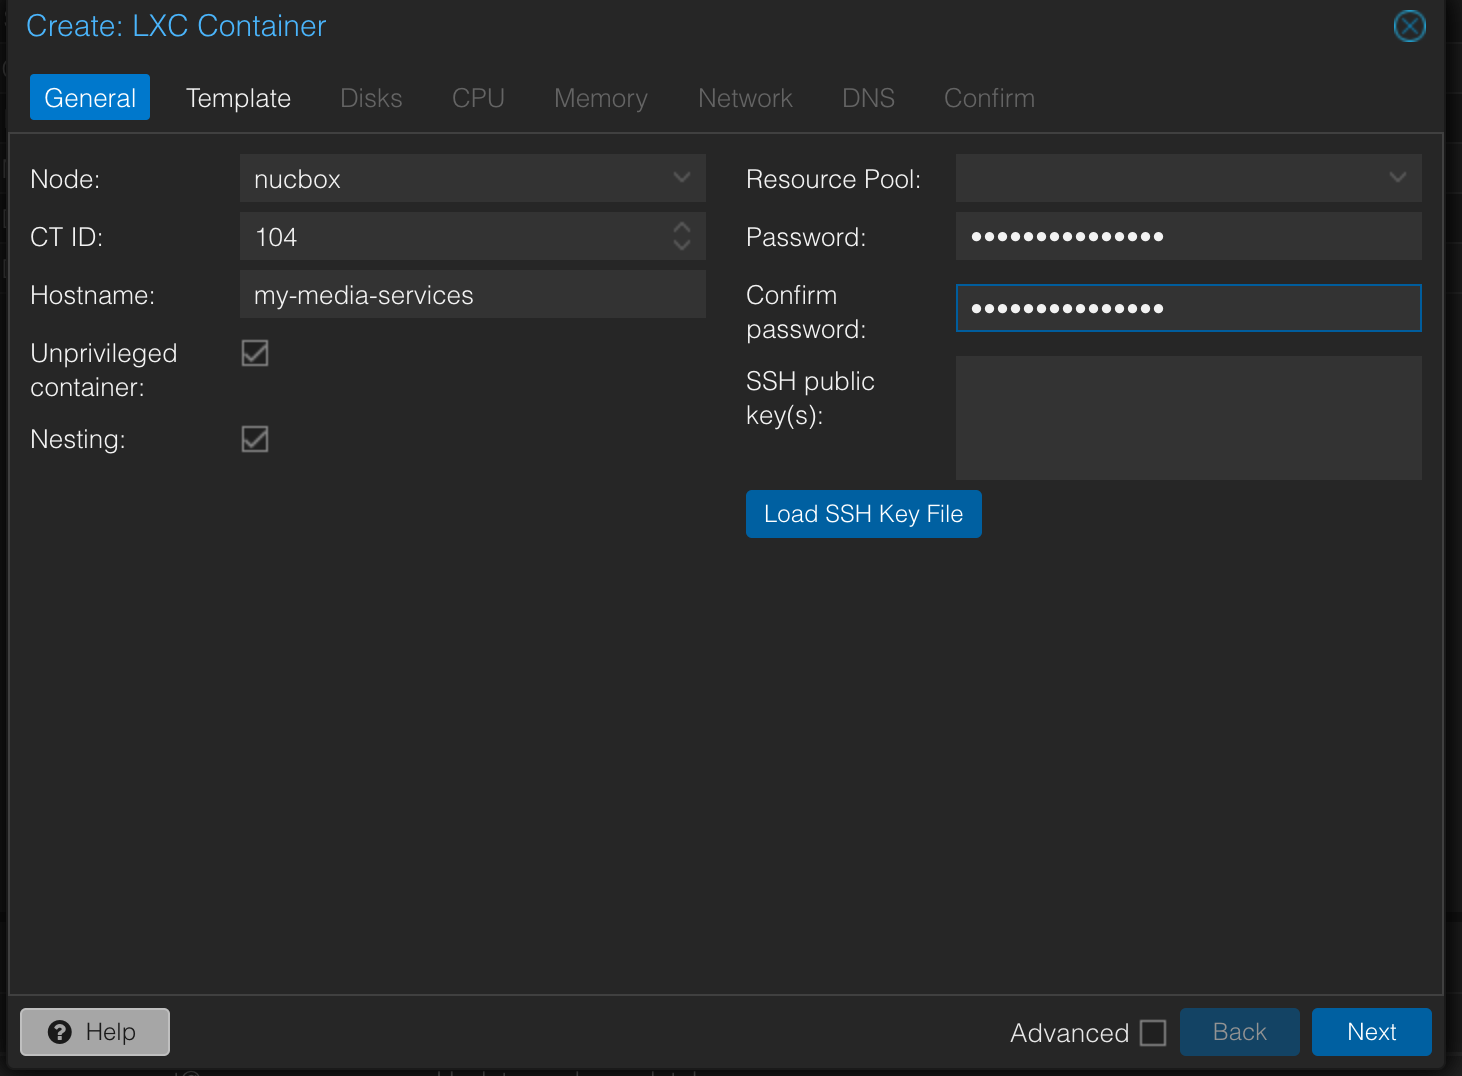
General Settings Tab:
- CT ID: Assign a unique ID for your container. It typically auto-increments.
- Hostname: Provide a descriptive hostname (e.g.,
my-media-services). - Unprivileged container: Crucially, check this box. Running an unprivileged container significantly enhances security by preventing root access within the container from escalating to root on the host.
- Nesting: Leave this box checked. It's required for running Docker containers inside an unprivileged LXC.
- Set a secure password for the root user of this new container.
- Click Next.
-
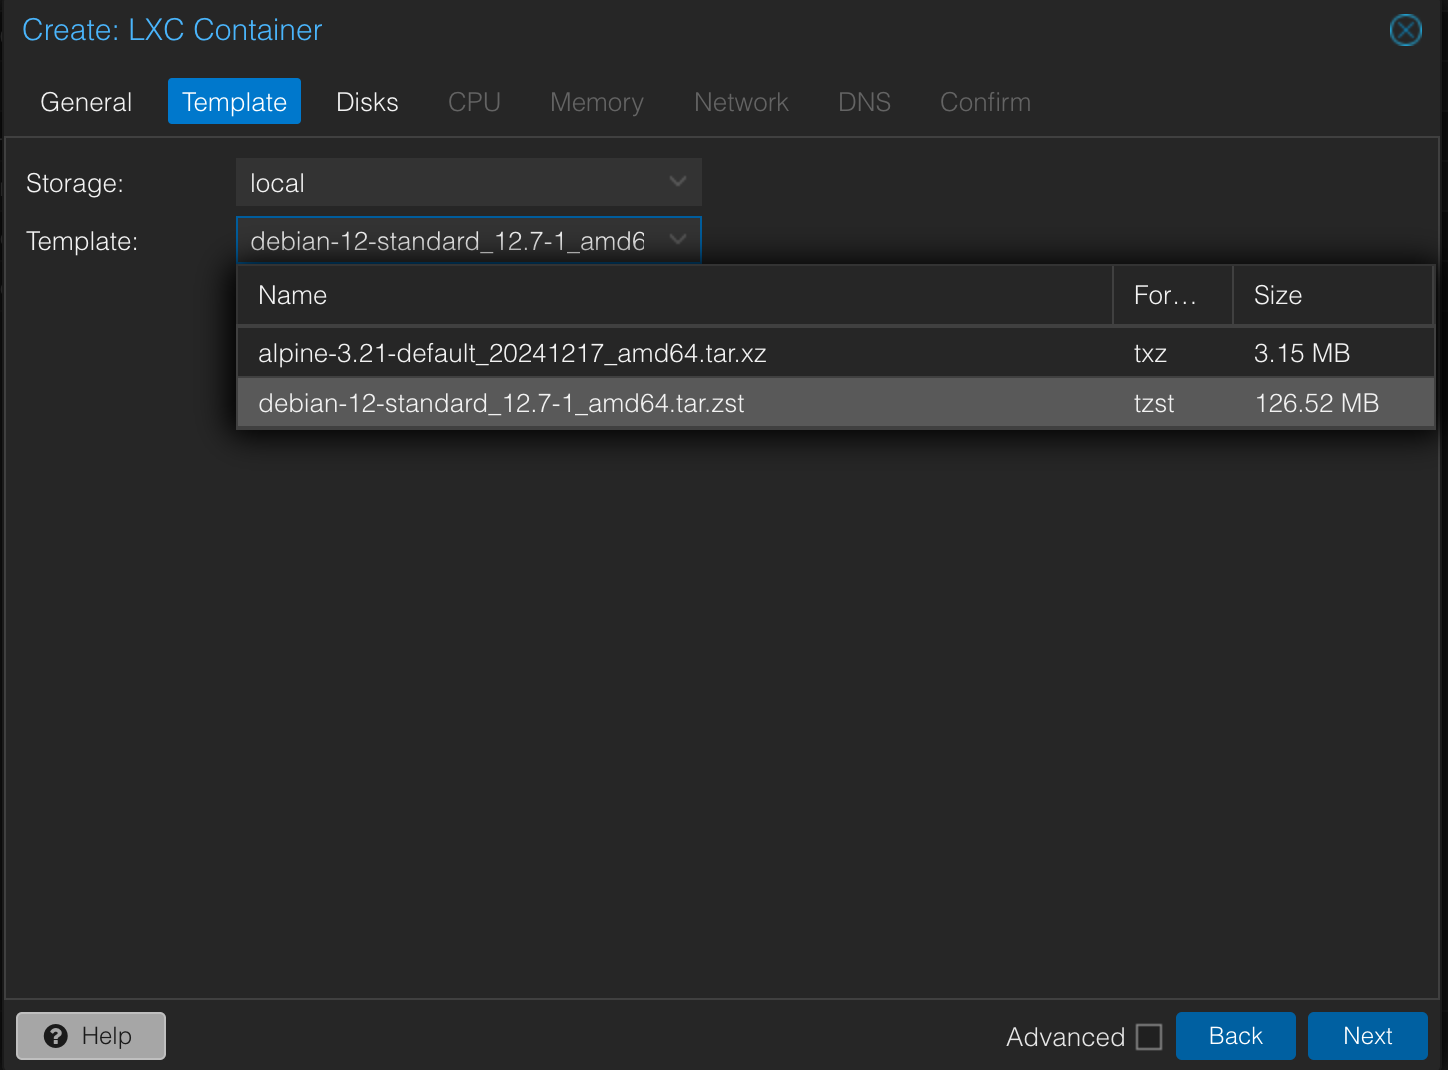
Template Tab:
- Storage: Select
local(or your preferred storage for templates). - Template: Choose a suitable Debian template (e.g.,
debian-12-standard_12.7-1_amd64.tar.zst). - To get more templates: In the Proxmox UI, navigate to
your-storage-node > CT Templates > Templatesand download your desired OS. Alternatively, you can usepveam updateandpveam download local debian-12-standard_12.7-1_amd64.tar.zston the Proxmox host's shell. - Click Next.
- Storage: Select
-
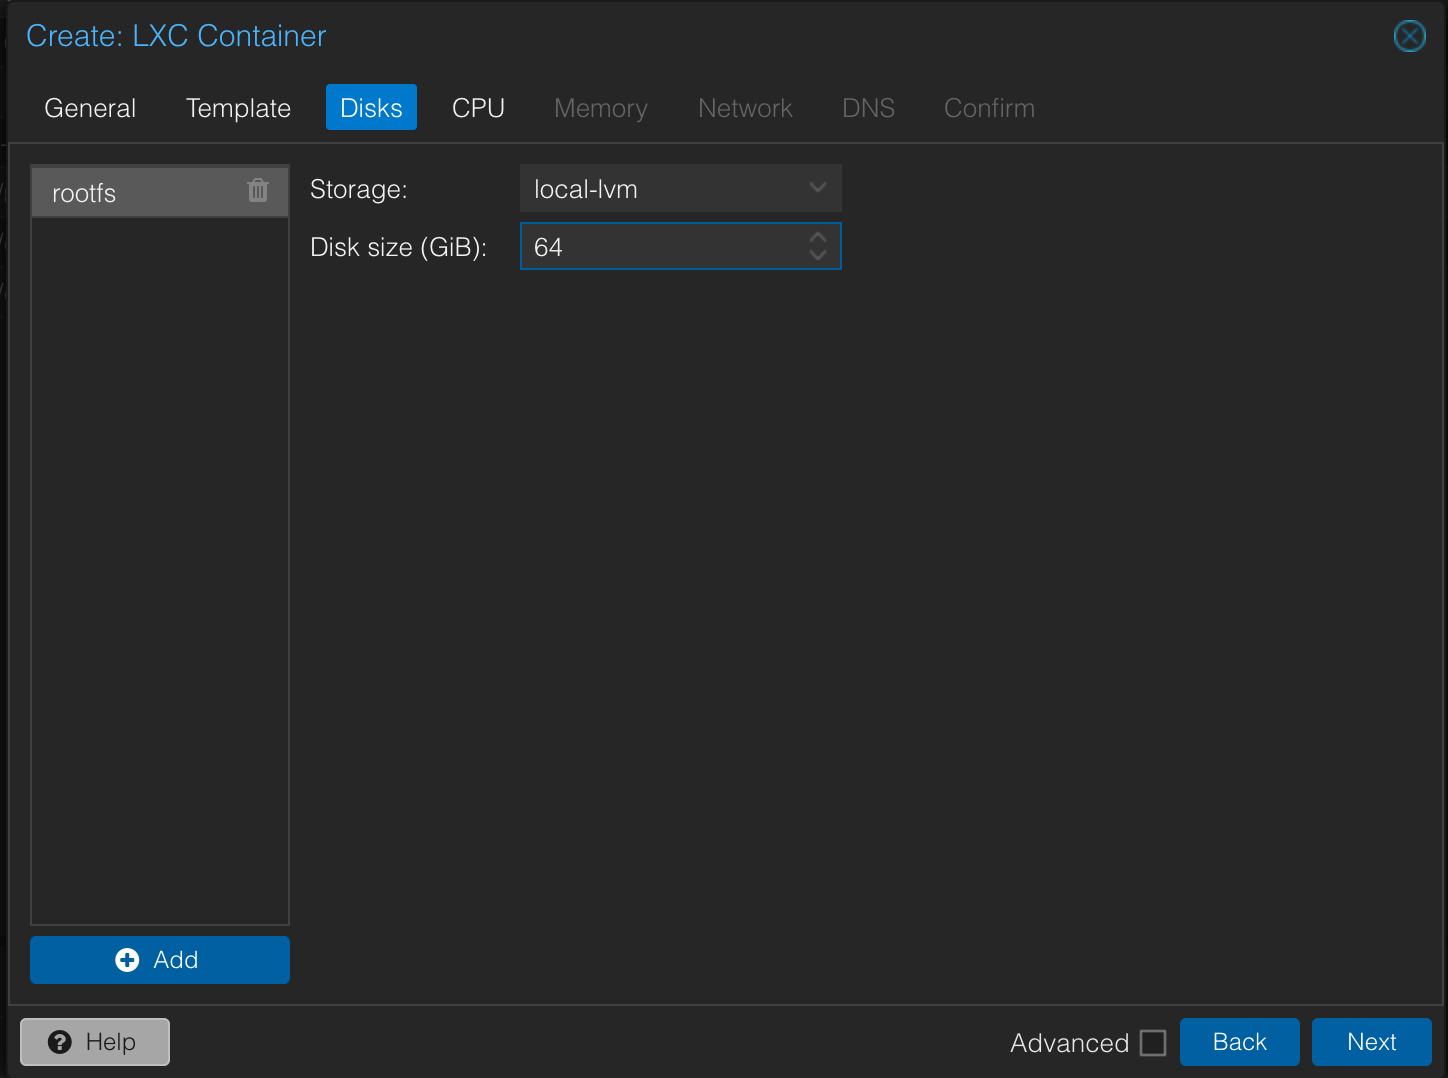
Disks Tab:
- Disk size (GiB): Set the root disk size. 64 GiB is a good starting point, providing ample space for the OS and Docker configurations. Your media will reside on a separate external drive.
- Click Next.
-
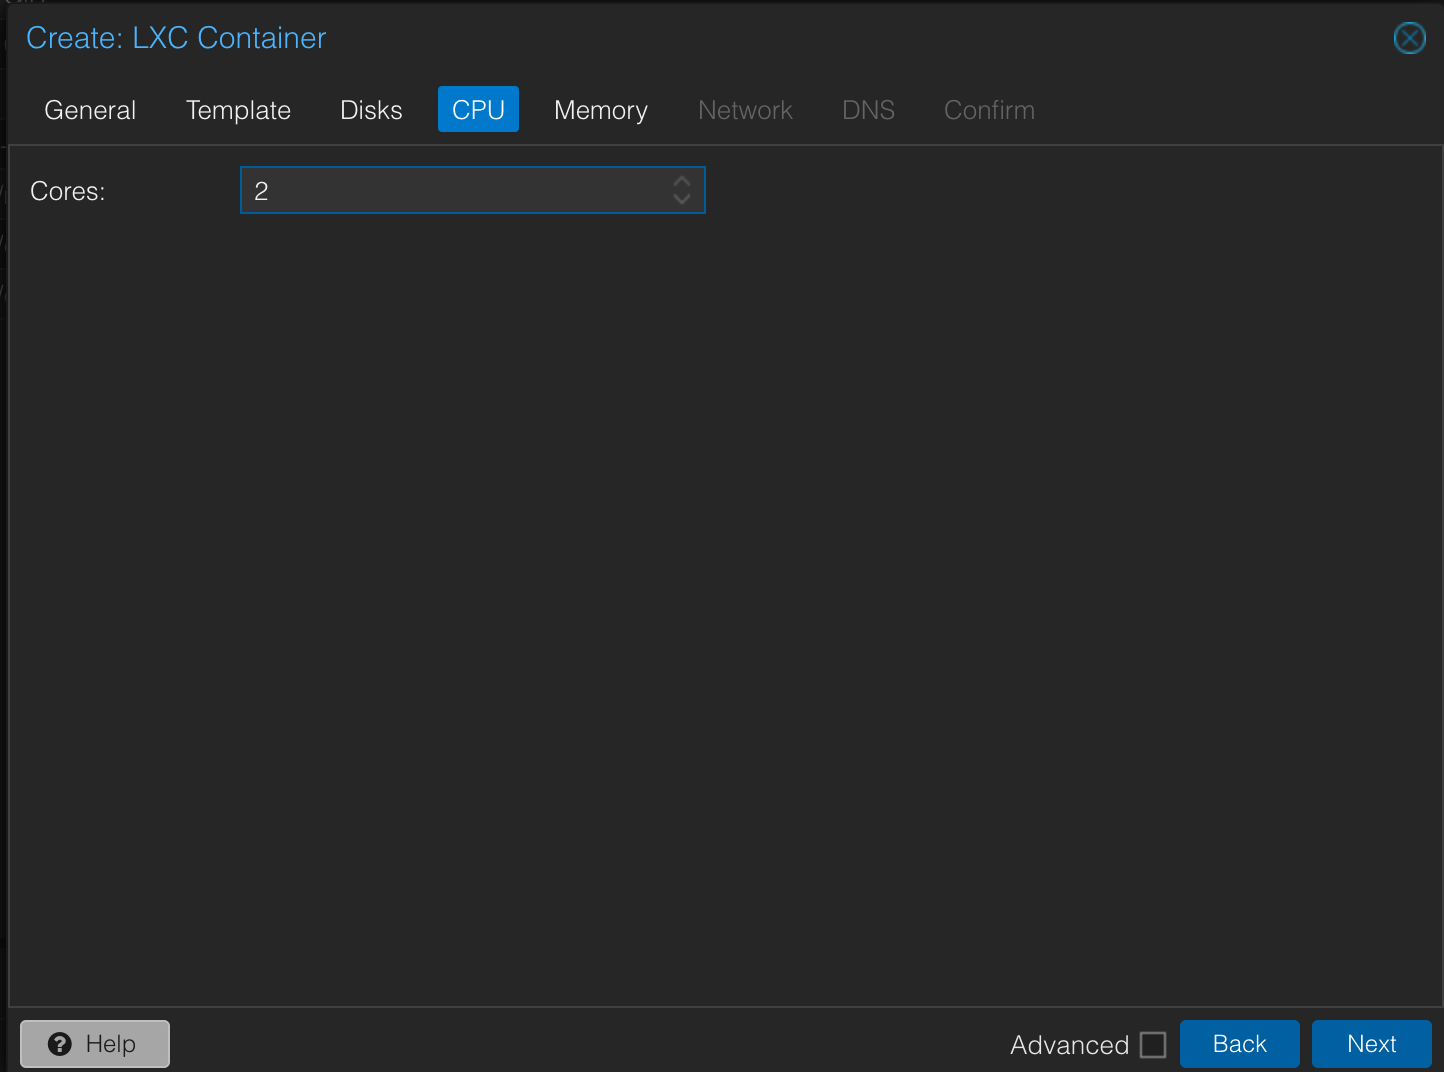
CPU Tab:
- Cores: Allocate a minimum of
2cores. This is essential for handling Jellyfin's transcoding and streaming demands. - Click Next.
- Cores: Allocate a minimum of
-
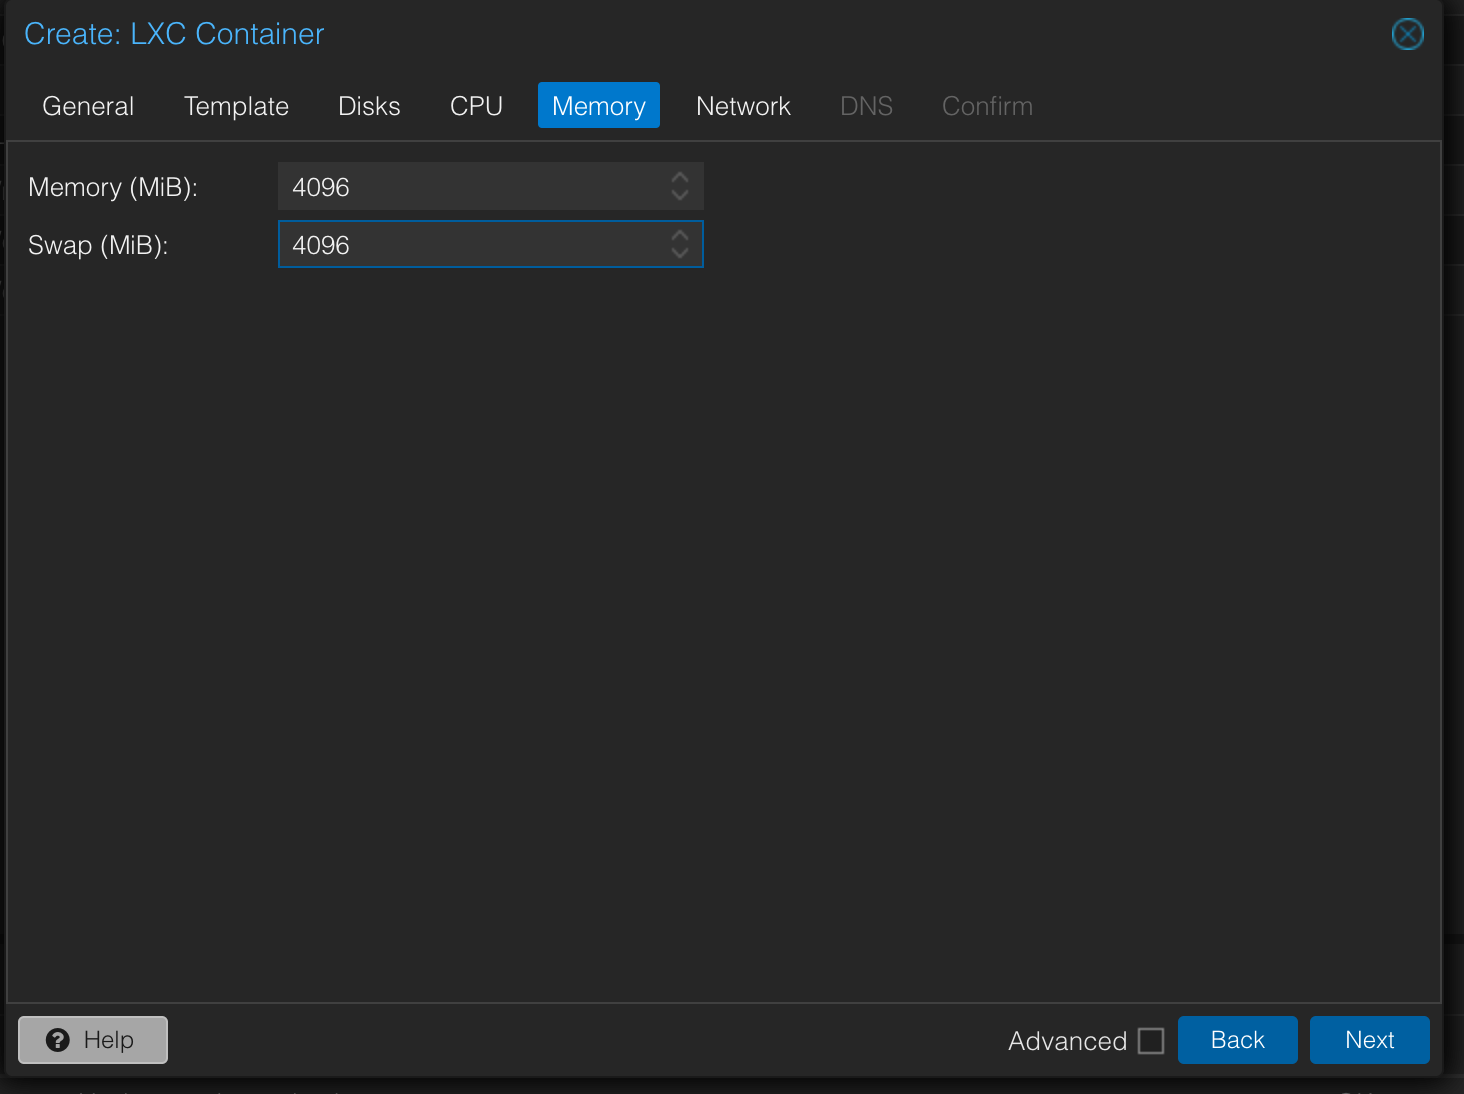
Memory Tab:
- Memory (MiB): Assign at least
4096MiB (4 GiB) of RAM. This comfortably covers Jellyfin's requirements and other media services. - Swap (MiB): Set this to
4096MiB as well. - Click Next.
- Memory (MiB): Assign at least
-
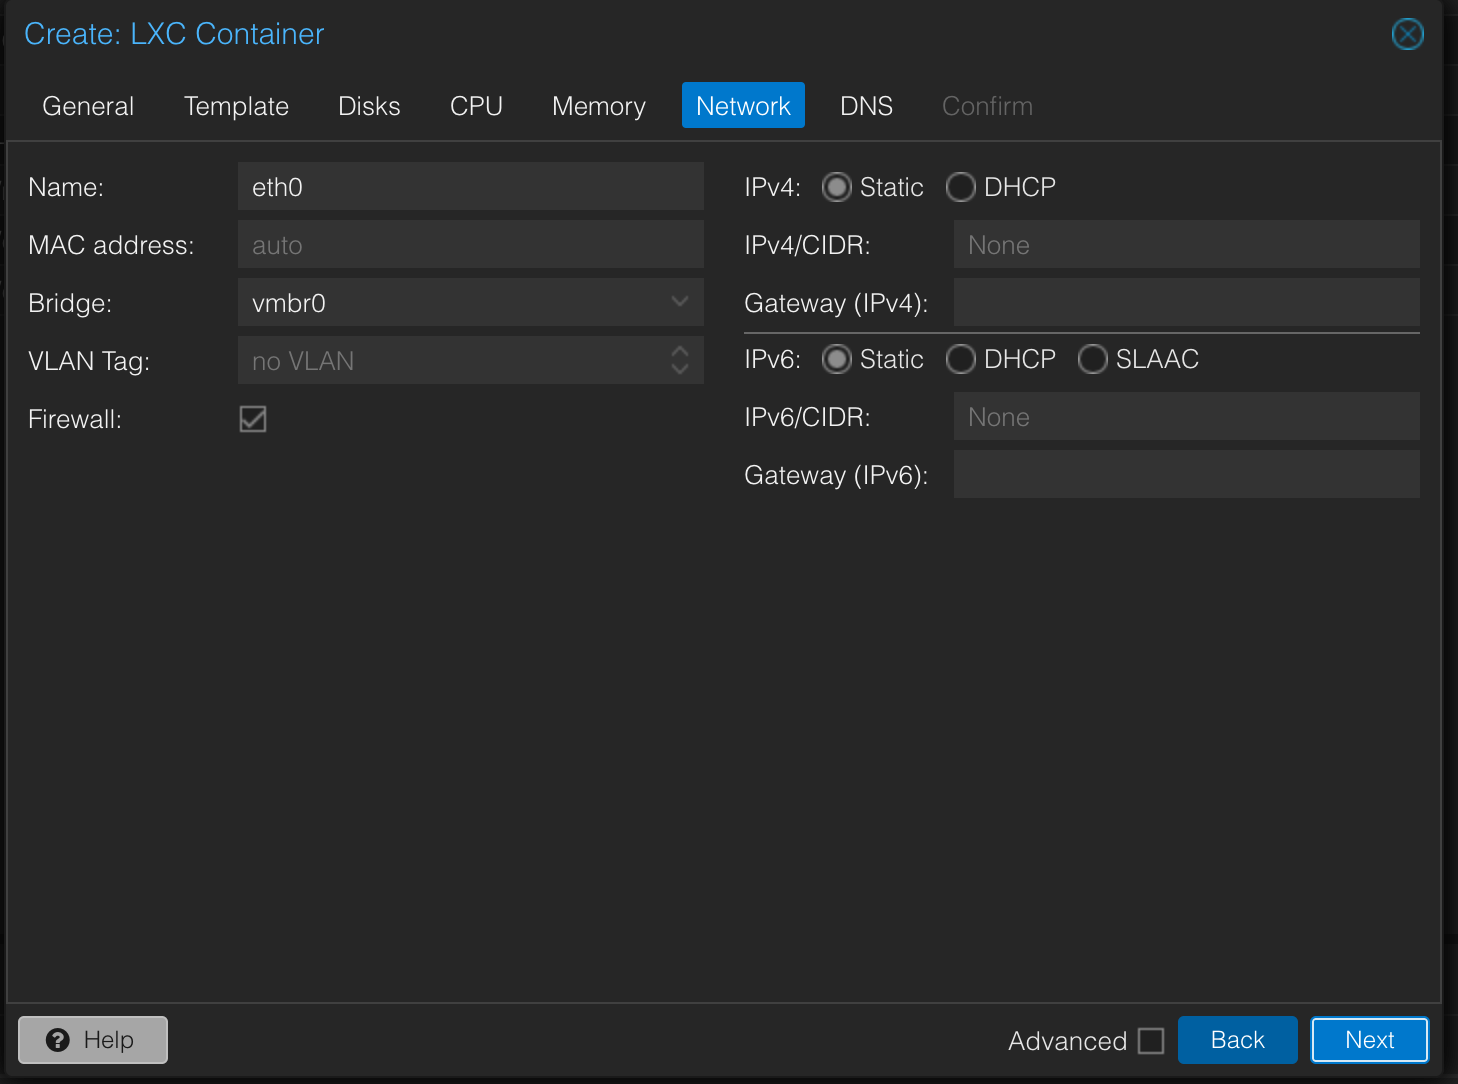
Network Tab:
- IPv4: Select
Static. - IPv4/CIDR: Enter an IP address for your LXC that is outside your router's DHCP range (e.g.,
192.168.1.100/24). - Gateway (IPv4): Point this to your router's IP address.
- Click Next.
- IPv4: Select
-
DNS Tab: You can usually leave the default settings to use the host's DNS configuration. Click Next.
-
Confirm Tab: Review all your settings. If everything looks correct, click Finish.
1.2. LXC Configuration File Details
After creation, the Proxmox host will generate a configuration file for your LXC (e.g., /etc/pve/lxc/100.conf or /etc/pve/lxc/104.conf based on your chosen ID). We'll need to manually add some crucial lines to this file for GPU passthrough and unprivileged container features.
# Example /etc/pve/lxc/104.conf
arch: amd64
cores: 2
memory: 4096
unprivileged: 1 # Essential for unprivileged LXC
features: nesting=1,keyctl=1 # Required for Docker within unprivileged LXC
mp0: /mnt/media,mp=/mnt/media # USB HDD mount passthrough from host to container
# If using a separate DAS/NAS later, you can add another mount point:
# mp1: /mnt/das-media,mp=/mnt/das # Passthrough entire disk for DAS
lxc.cgroup2.devices.allow: c 226:* rwm # Allows access to /dev/dri for VAAPI
lxc.mount.entry: /dev/dri dev/dri none bind,optional,create=dir # Binds GPU device
lxc.idmap: u 0 100000 1000 # Maps host UIDs to container UIDs for unprivileged LXC
lxc.idmap: g 0 100000 1000
lxc.idmap: u 1000 1000 1  # Maps specific host user (UID 1000) to container user (UID 1000)
lxc.idmap: g 1000 1000 1
lxc.apparmor.profile: unconfined # Necessary for Docker to function correctly within the LXC
Explanation of Key Configuration Options:
unprivileged: 1: Enables the unprivileged LXC mode, significantly improving security.features: nesting=1,keyctl=1: These features are absolutely vital for running Docker inside an unprivileged LXC. Without them, Docker will not function correctly.mp0: /mnt/media,mp=/mnt/media: This line mounts the USB HDD, which is connected and mounted on your Proxmox host at/mnt/media, directly into the LXC at/mnt/media.lxc.cgroup2.devices.allow: c 226:* rwm&lxc.mount.entry: /dev/dri dev/dri none bind,optional,create=dir: These entries are for GPU passthrough (VAAPI). They grant the LXC access to the host's integrated graphics device (/dev/dri) for hardware transcoding.lxc.idmap: These lines manage User ID (UID) and Group ID (GID) mapping between the Proxmox host and the LXC. Specifically,lxc.idmap: u 1000 1000 1andlxc.idmap: g 1000 1000 1map a host user with UID/GID 1000 (e.g., your regular user,simon) to the same UID/GID inside the container (e.g.,mediauser). This is crucial for consistent file permissions.lxc.apparmor.profile: unconfined: Necessary for Docker to operate without AppArmor restrictions within the unprivileged LXC.
1.3. Mounting the USB HDD on the Proxmox Host
Before the LXC can access your media, the USB HDD must be properly identified and mounted on your Proxmox host. This step can be done via the Proxmox GUI or command line.
Option A: Mounting via Proxmox GUI
-
Identify the Disk: In the Proxmox UI, navigate to
Datacenter > Your_Node > Disks. Identify your USB drive by its size or model. It will typically be listed assda,sdb, etc. (e.g.,/dev/sdb). -
Wipe Disk (If new or re-purposing, DANGER: This will erase all data!):
- If the drive is new or you want to erase all existing data, select the disk under
Disksand click "Wipe Disk". Choose a method (e.g., "DD" for a full wipe). This step is irreversible.
- If the drive is new or you want to erase all existing data, select the disk under
-
Create Partition Table and Format (If new or re-purposing, DANGER: This will erase all data!):
- After wiping (or if the drive has an existing partition table you want to overwrite), select the disk and click "Create GPT" (recommended for modern systems).
- Then, click "Create: Directory" or "Create: LVM-Thin" (depending on your preference and planned usage; for simple media storage, "Directory" is usually sufficient). Choose
ext4as the filesystem. This will format the disk and create a mount point.
-
Add Mount Point as Directory Storage: If you chose "Create: Directory", this process automatically adds the disk as a storage entry in Proxmox. You can find it under
Datacenter > Storage. Note the path (e.g.,/mnt/pve/your-disk-id). -
Set Permissions (CLI recommended): Even after mounting via GUI, it's good practice to ensure correct permissions from the CLI.
sudo chown -R 1000:1000 /mnt/pve/your-disk-id # Replace with your actual mount path
Option B: Mounting via Proxmox CLI
-
Identify the USB Drive:
# List block devices with filesystem info to identify your USB drive
lsblk -f
Look for your USB drive (e.g.,
/dev/sdb1if already partitioned, or/dev/sdbfor the whole disk). Note its UUID or device path. -
Unmount Drive (if mounted):
- If the drive is already mounted (e.g., from a previous attempt or automatic mount), unmount it before partitioning/formatting.
# Replace /dev/sdb1 with your actual partition or mount point sudo umount /dev/sdb1 -
Format Drive (if necessary, DANGER: This will erase all data!):
- If your drive is new or you want to reformat it, you'll need to create a partition and then format it.
- Create Partition Table (Example using
fdiskfor GPT):# Replace /dev/sdX with your whole disk, # e.g., /dev/sdb (NOT a partition like /dev/sdb1) sudo fdisk /dev/sdX- Inside fdisk:
# g (create a new empty GPT partition table) # n (add a new partition - accept defaults for primary, first/last sector) # w (write table to disk and exit)- Format Partition (Example for ext4):
# Replace /dev/sdX1 with your newly created partition (e.g., /dev/sdb1) sudo mkfs.ext4 /dev/sdX1 - Ensure your USB HDD is formatted with a suitable filesystem like
ext4orNTFS. AvoidFAT32due to its limitations with large file sizes.
-
Create a Mount Point:
# Create the directory where the USB drive will be mounted sudo mkdir -p /mnt/media -
Add to Host's
/etc/fstabfor Persistent Mount: This ensures the drive is mounted automatically on boot. Replace<YOUR_DRIVE_UUID>with the actual UUID fromlsblk -f(e.g.,UUID="1234-ABCD"for the formatted partition).# Using UUID is recommended for reliable mounting echo "UUID=<YOUR_DRIVE_UUID> /mnt/media ext4 defaults 0 2" | sudo tee -a /etc/fstab -
Mount the Drive:
# Apply all mounts defined in /etc/fstab sudo mount -a -
Set Permissions on the Host: This ensures the mapped user (UID 1000) has ownership of the mounted directory.
# Set ownership for the media user (UID 1000)
sudo chown -R 1000:1000 /mnt/media
1.4. Permanent Mount Inside the LXC
Even with host passthrough, for robustness, configure the LXC to bind mount the passed-through storage.
-
Create Mount Point Inside LXC:
# Create the mount point directory inside the LXC mkdir -p /mnt/media -
Add to LXC's
/etc/fstab:# Add a bind mount entry to the LXC's fstab # /mnt/pve/usb-hdd is the internal path Proxmox uses for host-mounted directories passed to LXCs echo "/mnt/pve/usb-hdd /mnt/media none bind,defaults 0 0" | sudo tee -a /etc/fstabNote:
/mnt/pve/usb-hddis the path Proxmox uses internally for bind-mounted host directories within the LXC. Do not change this unless you've explicitly configured it differently in Proxmox. -
Apply Mount:
# Apply the fstab changes inside the LXC
mount -a
2. Docker & Docker-Compose Installation
With the LXC configured and storage accessible, the next step is to install Docker and Docker Compose within the LXC.
2.1. Installation Steps
Head to the shell in the UI or SSH into the LXC and run the following commands:
Bash
# Update package lists
apt update
# Install Docker (using the official convenience script)
curl -sSL https://get.docker.com | sh
# Install Docker Compose Plugin
apt install -y docker-compose-plugin
# Add your media user (e.g., 'mediauser') to the docker group.
# This allows the user to run docker commands without sudo.
usermod -aG docker mediauser
Log out and log back into your LXC for the group changes to take effect.
2.2. Directory Structure
A well-organized directory structure is key for managing your Docker Compose setup and persistent application data. Create the following structure:
/srv/docker-media-server/
├── docker-compose.yml
├── .env                  # Contains environment variables (VPN credentials, UIDs/GIDs, etc.)
├── gluetun/              # Configuration for Gluetun
├── jellyfin/config/      # Configuration for Jellyfin
├── qbittorrent/config/   # Configuration for qBittorrent
├── sonarr/config/        # Configuration for Sonarr
├── radarr/config/        # Configuration for Radarr
└── prowlarr/config/      # Configuration for Prowlarr
2.3. Fix Ownership for Docker Directories
Ensure your mediauser has proper ownership of the Docker configuration directory to avoid permission issues.
Bash
chown -R mediauser:mediauser /srv/docker-media-server
3. Docker Compose Configuration (docker-compose.yml)
This docker-compose.yml file is the blueprint for your media server, orchestrating all services and, critically, routing their traffic through the Gluetun VPN container for privacy.
Place this file in /srv/docker-media-server/docker-compose.yml.
YAML
version: '3.8'
services:
  gluetun:
    image: qmcgaw/gluetun
    container_name: gluetun
    cap_add:
      - NET_ADMIN
    devices:
      - /dev/net/tun
    volumes:
      - /srv/docker-media-server/gluetun:/gluetun
    environment:
      - VPN_SERVICE_PROVIDER=nordvpn
      - OPENVPN_USER=<span class="math-inline">\{OPENVPN\_USER\}
\- OPENVPN\_PASSWORD\=</span>{OPENVPN_PASSWORD}
      - SERVER_COUNTRIES=<span class="math-inline">\{SERVER\_COUNTRIES\}
\- SERVER\_GROUP\=</span>{SERVER_GROUP}
      # Exposing necessary ports for internal communication and external access
      - VPN_INPUT_PORTS=8080,8096,8989,7878,8686,9696,6881/udp # Exposes ports for other services to use through the VPN tunnel
    ports:
      - 8080:8080 # qBittorrent Web UI (accessible from host network)
      - 8096:8096 # Jellyfin Web UI (accessible from host network)
      - 8989:8989 # Sonarr Web UI (accessible from host network)
      - 7878:7878 # Radarr Web UI (accessible from host network)
      - 8686:8686 # Prowlarr Web UI (accessible from host network)
      - 9696:9696 # For internal application communication
      - 6881:6881/udp # qBittorrent (for torrent traffic)
    restart: unless-stopped

  jellyfin:
    image: jellyfin/jellyfin
    container_name: jellyfin
    network_mode: "service:gluetun" # ALL Jellyfin traffic routes through Gluetun
    volumes:
      - /mnt/media:/media # Mounts the main media library
      - /srv/docker-media-server/jellyfin/config:/config # Persists Jellyfin configuration
    environment:
      - PUID=<span class="math-inline">\{PUID\}
\- PGID\=</span>{PGID}
    depends_on:
      - gluetun
    restart: unless-stopped

  qbittorrent:
    image: linuxserver/qbittorrent
    container_name: qbittorrent
    network_mode: "service:gluetun" # ALL qBittorrent traffic routes through Gluetun
    environment:
      - PUID=<span class="math-inline">\{PUID\}
\- PGID\=</span>{PGID}
      - WEBUI_PORT=<span class="math-inline">\{WEBUI\_PORT\}
volumes\:
\- /srv/docker\-media\-server/qbittorrent\:/config \# Persists qBittorrent configuration
\- /mnt/media\:/downloads \# Mounts the download directory
depends\_on\:
\- gluetun
restart\: unless\-stopped
sonarr\:
image\: linuxserver/sonarr
container\_name\: sonarr
network\_mode\: "service\:gluetun" \# ALL Sonarr traffic routes through Gluetun
environment\:
\- PUID\=</span>{PUID}
      - PGID=<span class="math-inline">\{PGID\}
volumes\:
\- /srv/docker\-media\-server/sonarr\:/config \# Persists Sonarr configuration
\- /mnt/media\:/media \# Mounts the media library for Sonarr to organize
\- /mnt/media\:/downloads \# Mounts the download directory for Sonarr to access
depends\_on\:
\- gluetun
restart\: unless\-stopped
radarr\:
image\: linuxserver/radarr
container\_name\: radarr
network\_mode\: "service\:gluetun" \# ALL Radarr traffic routes through Gluetun
environment\:
\- PUID\=</span>{PUID}
      - PGID=<span class="math-inline">\{PGID\}
volumes\:
\- /srv/docker\-media\-server/radarr\:/config \# Persists Radarr configuration
\- /mnt/media\:/media \# Mounts the media library for Radarr to organize
depends\_on\:
\- gluetun
restart\: unless\-stopped
prowlarr\:
image\: linuxserver/prowlarr
container\_name\: prowlarr
network\_mode\: "service\:gluetun" \# ALL Prowlarr traffic routes through Gluetun
environment\:
\- PUID\=</span>{PUID}
      - PGID=${PGID}
    volumes:
      - /srv/docker-media-server/prowlarr:/config # Persists Prowlarr configuration
    depends_on:
      - gluetun
    restart: unless-stopped
3.1. Environment Variables (.env file)
Create a .env file in the same directory as your docker-compose.yml (/srv/docker-media-server/.env). This securely stores sensitive information and common configurations.
Code snippet
# VPN credentials for Gluetun
OPENVPN_USER=your_openvpn_username
OPENVPN_PASSWORD=your_openvpn_password

# Media server configurations (User for Jellyfin, Sonarr, Radarr, qBittorrent)
PUID=1000           # The user ID for the media files (replace 1000 with your actual user ID from the host)
PGID=1000           # The group ID for the media files (replace 1000 with your actual group ID from the host)

# VPN settings
SERVER_COUNTRIES=Netherlands
SERVER_GROUP=P2P

# Docker container settings
WEBUI_PORT=8080      # Web UI port for qBittorrent (make sure this matches the port exposed in gluetun and in qbittorrent's internal config)
4. VAAPI Transcoding Preparation and Tuning
Hardware-accelerated transcoding is crucial for smooth media playback, especially for high-resolution content, as it significantly offloads processing from the CPU to your integrated GPU.
4.1. Install VAAPI Drivers in LXC
Bash
apt update && apt install -y intel-media-va-driver-non-free vainfo
4.2. Verify VAAPI Capabilities
After installation, run vainfo inside the LXC to confirm that your GPU's VAAPI capabilities are recognized. You should see VAEntrypointVLD listed, indicating that hardware decoding is functional.
Bash
vainfo
4.3. Jellyfin Transcoding Settings
Configure Jellyfin to utilize the hardware acceleration:
- Enable VAAPI: In Jellyfin's Dashboard, navigate to
Playbackand ensureEnable VAAPIis checked. - Transcode Temp Folder: Set the transcode temporary folder to
/dev/shm(RAMdisk). This is a best practice to reduce unnecessary wear on your SSD by using RAM for temporary transcoding files. - FFmpeg Arguments for HDR Tone-Mapping: For optimal High Dynamic Range (HDR) content playback with proper tone-mapping, add the following FFmpeg arguments in Jellyfin's transcoding settings:
Bash
This command instructs FFmpeg to use the GPU for HDR tone-mapping.-vaapi_device /dev/dri/renderD128 -vf 'format=nv12|vaapi,hwupload,tonemap_vaapi=format=p010'
4.4. Troubleshooting VAAPI
- Check active transcoding: To verify Jellyfin is using the GPU, check for the
renderD128device inside the Jellyfin container: Bash
It should displaydocker exec jellyfin ls -la /dev/drirenderD128if the GPU passthrough is successful. - CPU Usage: During 4K to 1080p transcodes, CPU usage should ideally remain below 30% if hardware acceleration is working correctly.
5. Permission Management
Correct file and directory permissions are absolutely critical for the media server to function correctly, especially when dealing with unprivileged LXCs and shared volumes.
5.1. Host ↔ Container UID/GID Mapping
As configured in your LXC's conf file, the host user (e.g., simon with UID 1000) is explicitly mapped to a user with the same UID (1000, e.g., mediauser) inside the container. This direct mapping simplifies permission management for your shared media volumes. Files created by Docker containers within the LXC will appear on the host with a different UID (e.g., 101000) due to the unprivileged LXC's internal ID shift, but they remain accessible to your mapped user.
5.2. Fixing Ownership on the Host
Ensure the primary media storage on your Proxmox host (/mnt/media) is owned by the user ID that is mapped into the container (e.g., UID 1000).
Bash
sudo chown -R 1000:1000 /mnt/media # Adjust /mnt/media to your actual mount point
6. Maintenance & Troubleshooting
6.1. Essential Docker Commands
| | |
| ------------------------------ | --------------------------------------------- |
| Task | Command |
| Start the Docker stack | docker-compose up -d |
| Stop the Docker stack | docker-compose down |
| Restart the Docker stack | docker-compose down && docker-compose up -d |
| Check container logs | docker logs <container_name> |
| Update containers | docker-compose pull && docker-compose up -d |
| Clean up unused Docker objects | docker system prune |
6.2. Debugging Common Issues
| | |
| ------------------------------------------- | ----------------------------------------------------------------------------------------------------------------------------------------------------------------------------------------------------------- |
| Issue | Solution |
| Permission denied | Ensure correct PUID/PGID in .env. Within the LXC, run chown -R mediauser:mediauser /path/to/volume. On the Proxmox host, verify ownership with sudo chown -R 1000:1000 /mnt/media. |
| Port not accessible | Verify the ports section in gluetun and VPN_INPUT_PORTS in Gluetun's environment variables in docker-compose.yml. Check firewall rules on both the Proxmox host and the LXC. |
| Transcoding issues | Confirm vainfo output, Jellyfin VAAPI settings, and correct FFmpeg arguments. Verify /dev/dri access within the Jellyfin container. |
| VPN not connecting | Check Gluetun logs (docker logs gluetun). Verify OPENVPN_USER, OPENVPN_PASSWORD, SERVER_COUNTRIES in your .env file. Ensure cap_add: NET_ADMIN and devices: /dev/net/tun are set for Gluetun. |
| Internet connectivity from inside a service | docker exec <service_name> ping google.com to test if traffic is routing through Gluetun correctly. |
7. Backup Strategy
Implementing a robust backup strategy is non-negotiable for safeguarding your media server's configuration and data.
7.1. Critical Paths to Backup
- Docker Configuration: The entire
/srv/docker-media-serverdirectory (containsdocker-compose.yml,.env, and all service-specific configuration folders). - Media Files: Your main media library, typically
/mnt/media(or/mnt/media_driveif you used that naming). - LXC Configuration: The LXC configuration file on the Proxmox host, located at
/etc/pve/lxc/100.conf(or102.conf/104.confbased on your CT ID).
7.2. Example Backup Command (on Proxmox Host)
Bash
sudo tar -czvf media-server-backup-$(date +%Y%m%d).tar.gz /srv/docker-media-server /etc/pve/lxc/104.conf
Remember to save this backup file to an off-site or separate storage location for true disaster recovery.
8. Initial Configuration of Services (Post-Deployment)
Once your Docker containers are up and running, you'll need to perform some initial setup within each application.
- Jellyfin: Access the Web UI at
http://<LXC_IP>:8096. Follow the first-time setup wizard to create an admin user and add your media libraries (pointing to/mediainside the container). - qBittorrent: Access the Web UI at
http://<LXC_IP>:8080. The default credentials areadmin/adminadmin. Change these immediately! Configure your download directory to/downloadsinside the container. - Sonarr: Access the Web UI at
http://<LXC_IP>:8989. Add Prowlarr as an indexer and qBittorrent as your download client. Configure your series root folder to/media. - Radarr: Access the Web UI at
http://<LXC_IP>:7878. Similar to Sonarr, add Prowlarr as an indexer and qBittorrent as your download client. Configure your movies root folder to/media. - Prowlarr: Access the Web UI at
http://<LXC_IP>:8686. Add your desired indexers and integrate them with Sonarr and Radarr.